Tuesday, November 30, 2010

Developer Dashboard in SharePoint 2010


Do users complain about SharePoint performance? Prior to SharePoint 2010, tracking down performance bottlenecks might involve attaching a debugger to code and enabling a trace from the SQL Server Profiler. Now, with SharePoint 2010, you can use a cool new feature called Developer Dashboard.

Solution

The SharePoint 2010 Developer Dashboard displays tracing and diagnostic information about page rendering and includes information about page components, controls, queries and execution time (an analogy of ASP.NET page tracing).

The Developer Dashboard feature is disabled by default and can be enabled or used on demand either by using STSADM SharePoint Administrative tool or a PowerShell cmdlet or using an API object model. The Unified Logging Service (ULS) logs contain information details about performance issues and resource usage, but analyzing ULS raw data is very difficult and takes time. The Developer Dashboard displays all of this information in a graphical way which makes understanding/troubleshooting quite easier.
The Developer Dashboard works in three different modes.
If you are changing it programmatically, you would use this enumeration : SPDeveloperDashboardLevel), by default it's in OFF mode where it will not capture any tracing information (no debugging information instrumentation).
You can make it capture tracing information On-Demand (allows toggling to capture data or not) or you can put it in ON mode where it will capture all the tracing information all the time. This information is displayed on the bottom of the every page which uses a SharePoint Foundation 2010 master page or a custom master page included with the Dashboard control. You even include Dashboard control on any specific page you want, for detail refer to "Using Developer Dashboard on Custom Master Pages" section on this link.

Enabling/Disabling Developer Dashboard with STSADM

On a SharePoint 2010 installation, STSADM (by default) is in "C:\Program Files\Common Files\Microsoft Shared\web server extensions\14\BIN".

To turn it off (execute either of these two commands)

stsadm -o setproperty -pn developer-dashboard -pv off
stsadm -o setproperty -propertyname developer-dashboard -propertyvalue off

To turn it on demand (execute either of these two commands

stsadm -o setproperty -pn developer-dashboard -pv OnDemand
stsadm -o setproperty -propertyname developer-dashboard -propertyvalue OnDemand

When you enable Developer Dashboard on demand, you will notice a small icon on the top right corner of the page as shown below. Clicking on this icon will put the Developer Dashboard on the bottom section of the page. You can use this icon to toggle ON or OFF the Developer Dashboard.


To turn it on (execute either of these two commands)

stsadm -o setproperty -pn developer-dashboard -pv On
stsadm -o setproperty -propertyname developer-dashboard -propertyvalue On
Once you have enabled the Developer Dashboard, you will see similar information as shown below on your pages. This information includes performance counters which measure usage and resource consumption at the stage of the processing request . For example, Execution start time, Thread execution time, URL of the request, SQL statements generated by the request processing, call stack information about each WCF call, etc.. You can click on the link "Show or hide additional tracing information" shown on left bottom corner to display additional tracing information.


You can hover the mouse over each of the sections and a pop up will display additional information (as below):

Notice that database calls are hyperlinks. Clicking on this link will give you a complete picture about the SQL Command executed, the numbers of parameters passed and returned, IO stats from SQL and the call stack as you can see below:

Indexing PDF content in SharePoint

Many SharePoint portals require that content from PDF documents be available in SharePoint's search results.

By default, Windows SharePoint Services (WSS) 2.0/3.0, Microsoft SharePoint Foundation, SharePoint Portal Server 2003,  Microsoft Office SharePoint Server (MOSS) 2007 and even Microsoft SharePoint Server 2010 cannot index PDF documents.

Solution

In order to fix this issue, please follow the below steps:

Indexing PDF's metadata in WSS (2.0) & SharePoint Portal Server 2003 Libraries:

=> Download the free Adobe PDF IFilter 5.0 from the following Adobe web site : (Later versions like 6.0 can be used - Note there are different versions compatible for X32 / X64 bit machines)

http://www.adobe.com/support/downloads/detail.jsp?ftpID=1276

=> Go to each Index server(s) you have in your farm and stop the IIS admin service :

  • Start > Administrative Tools > Services.
  • Right Click "IIS Admin Service" > Stop.
  • Run the Adobe PDF IFilter installer to install the IFilter on each Index server(s).
  • Register the Adobe PDF IFilter:
    1. Start > Run.
    2. cmd > Ok (Enter)
    3. III. Change directory to "cd <drive>:\Program Files\Adobe\PDF IFilter 5.0, then type enter.
    4. Type "regsvr32.exe pdffilt.dll", then type enter.
    5. Wait until receiving the message "The Operation was successful" >Click "Ok".
    6. Type "exit", then enter to quit the command prompt "cmd".
=> Download the PDF icon image of size 96x96 (pxs) from the following location and save it as "pdf16.gif" somewhere to the local hard disk:

http://www.adobe.com/misc/linking.html

(Note that the file name for the PDF icon image must be "pdf16" instead of any customized file name, because if you use a customized file name for icon, you will be unable to see the correct icon in search results on SharePoint Portal Server 2003. There is a bug in SharePoint Portal Server 2003 which was fixed in MOSS 2007 & MS SharePoint Server 2010. However, there is a workaround ( MS - KB article) where you can format the file name for the icon as you like).

=> Copy the "pdf16.gif" icon image to the following location : "Drive:\Program Files\Common Files\Microsoft Shared\Web Server Extensions\60\Template\Images ".

=> Go to the following location "Drive:\Program Files\Common Files\Microsoft Shared\Web Server Extensions\60\Template\XML" and edit the "DOCICON.xml" file to add an entry for the ".pdf" extension and then save and quit the xml file:
<Mapping Key="pdf" Value="pdf16.gif">
=> Reboot the Index server(s) or restart all SharePoint services or even do an "IISRESET".

=> Add the ".pdf" file type to the content index:
  1. Connect to the portal site > Site Settings.
  2. Configure Search and Indexing (Under: "Search Settings & Indexed Content") > Include File Types (Under: "General Content Settings and Indexing Status").
  3. New File Type (On: "Specify File Types to Include").
  4. On "Add File Type" page, type "pdf" in the File extension box and click ok.
=> Update the context indexes for portal and for non-portal content:
  1. Site Settings > Configure Search and Indexing (Under: "Search Settings and Indexed Content").
  2. Manage Content Indexes (Under: "Content Indexes") > Click the down arrow next to the name of index that you want to update and click "Start Full Update".

Indexing PDF's Metadata in WSS (3.0) & MOSS 2007 Libraries

=> Download free Adobe PDF IFilter 6.0 from the following Adobe web site:

(Later versions like 9.0 can be used - Note there are different versions compatible for X32 / X64 bit machines)

http://www.adobe.com/support/downloads/detail.jsp?ftpID=2611

=> Go to each Index server(s) you have in your farm and stop the IIS admin service:
  1. Start > Administrative Tools > Services.
  2. Right Click "IIS Admin Service" > Stop.
=> Run the Adobe PDF IFilter installer to install the IFilter on each Index server(s).

=> Download the PDF icon image of size 17x17 (pxs) from the following location and save it as "icopdf.gif" somewhere to the local hard disk:

http://www.adobe.com/misc/linking.html

=> Copy the "icopdf.gif" icon image to the following location:

"Drive:\Program Files\Common Files\Microsoft Shared\Web Server Extensions\12\Template\Images ".

=> Go to the following location "Drive:\Program Files\Common Files\Microsoft Shared\Web Server Extensions\12\Template\XML" and edit the "DOCICON.xml" file to add an entry for the ".pdf" extension and then save and quit the xml file:
<Mapping Key="pdf" Value="icopdf.gif">
=> Reboot the Index server(s) or Restart all SharePoint services or even do an "IISRESET"..

=> Go to the Search Settings under Central Administration and add the PDF as a new file type.

=> Perform a full crawling at the Central Administration SSP (Shared Services Provider).

(Note here that MOSS supposed to search PDF documents properly but sometimes many people complain that they weren't able to get the PDF's displayed at the search results at MOSS 2007. So, Microsoft provides the below Hot fix to make this work for MOSS 2007):
  1. Add the following registry entry, and then set the registry entry value to pdf:

    HKEY_LOCAL_MACHINE\SOFTWARE\Microsoft\Shared Tools\Web Server Extensions\12.0\Search\Applications\\Gather\Search\Extensions\ExtensionList\38 To do this, follow these steps:
    • Click Start, click Run, type regedit, and then click Ok.
    • Locate and then click the following registry subkey:

      HKEY_LOCAL_MACHINE\SOFTWARE\Microsoft\Shared Tools\Web Server Extensions\12.0\Search\Applications\GUID\Gather\Search\Extensions\ExtensionList.
    • On the Edit menu, point to New, and then click String Value then type 38, and then press enter.
    • Right-click the registry entry that you created, and then click Modify then in the Value data box, type pdf, and then click ok.
  2. Verify that the following two registry sub keys are present and that they contain the appropriate values. Note these registry sub keys and the values that they contain are created when you installed the Adobe PDF IFilter on the server.

    • HKEY_LOCAL_MACHINE\SOFTWARE\Microsoft\Shared Tools\Web Server Extensions\12.0\Search\Setup\ContentIndexCommon\Filters\Extension\.pdf
      This registry subkey must contain the following registry entry:
      • Name: Default Type: REG_MULTI_SZ Data: {4C904448-74A9-11D0-AF6E-00C04FD8DC02}HKEY_LOCAL_MACHINE\SOFTWARE\Microsoft\Shared
        Tools\Web Server Extensions\12.0\Search\Setup\Filters\.pdf
    • This registry subkey must contain the following registry entries :
      • Name: Default Type: REG_SZ Data: (value not set)
      • Name: Extension Type: REG_SZ Data: pdf
      • Name: FileTypeBucket Type: REG_DWORD Data: 0x00000001 (1)
      • Name: MimeTypes Type: REG_SZ Data: application/pdf

  3. => Stop and then start the Windows SharePoint Services Search service:
  1. Run > type " cmd" >lick Ok.
  2. Stop the Windows SharePoint Services Search service this can be done via UI wizard at the Central Administration or via stsadm command by type "net stop spsearch" at the command prompt, and then press enter.
  3. Start the Windows SharePoint Services Search service. This can also be done via the UI wizard at the Central Administration or via the stsadm command or by typing "net start spsearch" at the command prompt, and then press enter.

Indexing PDF's Metadata in Foundation & Microsoft SharePoint Server 2010 Libraries:

  1. Download free Adobe PDF IFilter 9.0 (X64 bit) from the following Adobe web site:

    http://www.adobe.com/support/downloads/detail.jsp?ftpID=4025
  2. Download the PDF icon image of size 17x17 (pxs) from the following location and save it as "pdf16.gif" somewhere to the local hard disk:

    http://www.adobe.com/misc/linking.html
  3. Copy the "pdf16.gif" icon image to the following location:

    "Drive:\Program Files\Common Files\Microsoft Shared\Web Server Extensions\14\Template\Images".
  4. Go to the following location...

    "Drive:\Program Files\Common Files\Microsoft Shared\Web Server Extensions\14\Template\XML"

    ...and edit the "DOCICON.xml" file to add an entry for the ".pdf" extension and then save and quit the xml file:

    <Mapping Key="pdf" Value="pdf16.gif">
  5. Add PDF file type on the File Type page under Search Service Application.
  6. Run > Regedit.
  7. Navigate to the following location:

    HKEY_LOCAL_MACHINE\SOFTWARE\Microsoft\Office Server\14.0\Search\Setup\ContentIndexCommon\Filters\Extension
  8. Right Click > Click New > Key to create a new key for .pdf
  9. Add the following GUID in the default value {E8978DA6-047F-4E3D-9C78-CDBE46041603} 3}
  10. Restart the SharePoint Server Search 14 then reboot the SharePoint Servers in the Farm.
  11. Perform a Full Crawl to get the search results.

How to Move Large SharePoint Document Libraries from DEV to PROD


One recurring need that many firms face is that of moving or copying large Microsoft SharePoint document libraries from one site to another. These sites may be on the same SharePoint farm (e.g., between extranet sites), or from a staging to a production farm. There are several commercially available tools for handling such migrations, from vendors such as AvePoint and Metalogix, but those products can cost thousands of dollars and add significant complexity to your firm's "technology stack." In this article I'll show you how to move a document library of any size with just a bit of .NET code using the Windows SharePoint Services SDK.


THE PROBLEM
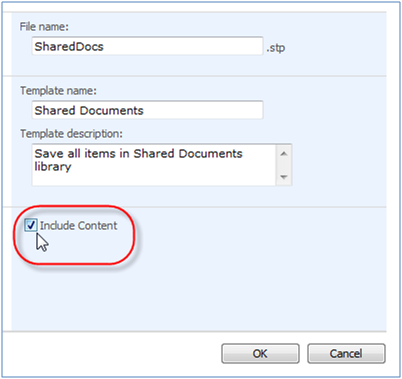
You may know that a SharePoint document library (or any list type) can be saved as a template using the native SharePoint web user interface. This feature is designed primarily as a means of saving the "format" of the library, including its field definitions and views. You do, however, have the option to save the library's content along with its definition by simply checking a box.
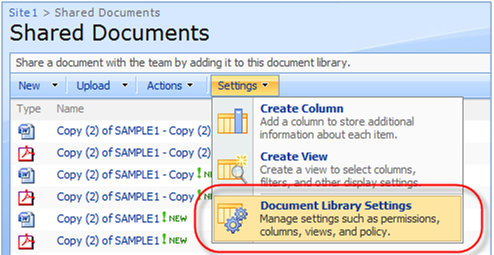
To save a document library and its contents to a template file, simply select the Settings menu option Document Library Settings from any view of your document library. Note that you will need to have full permissions on the document library to accomplish this task. See Figure 1.
Click image to enlarge
Figure 1. Editing document library settings. Click to enlarge.
Next, click on the "Save document library as template" link. See Figure 2.
Click image to enlarge
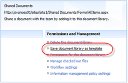
Figure 2: Saving the document library as a template. Click to enlarge.
Then fill in the resulting form to describe the document library template, check the "Include Content" box, and click OK. See Figure 3.
Click image to enlarge
Figure 3: Including content. Click to enlarge.
The above operation may succeed for small or empty document libraries, but for those over 10 megabytes, you will receive an error message similar to message in Figure 4, below.
Click image to enlarge
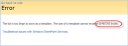
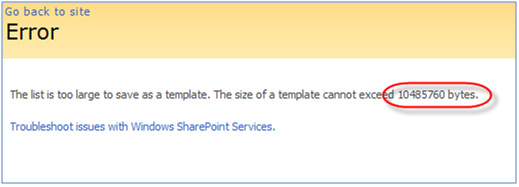
Figure 4: Error message displayed when attempting to export a large library. Click to enlarge.
In fact, the 10-megabyte limit may be increased so that you can export document libraries as large as 500 megabytes using the following STSADM command:
stsadm -o setproperty -propertyname max-template-document-size-propertyvalue 500000000


In fact, the 10-megabyte limit may be increased so that you can export document libraries as large as 500 megabytes using the following STSADM command:
stsadm -o setproperty -propertyname max-template-document-size-propertyvalue 500000000

The value 500000000 represents the maximum number of bytes to allow. If any document library you wish to export as a template is no larger than this value, you're all set!

At my firm, however, we regularly see document libraries in excess of 1 gigabyte, and have had many in the tens-of-gigabyte range. Leaving aside discussions of "best practices" for storage management, this makes transferring document libraries using templates unworkable for us in many instances.

ENTER STSADM EXPORT AND IMPORT 

SharePoint ships with the command-line utility STSADM (an example of which we saw in the preceding section). STSADM has a number of functions, including those for backing up and restoring site collections or web sites. STSADM also includes export and import functions that overlap with "backup" and "restore," and in many situations the two can be used interchangeably. The primary difference is that the backup and restore functions are designed with backup or disaster recovery in mind, and provide very limited control over what content is included in the backup. The export and import functions, on the other hand, provide the flexibility to copy an entire site collection or a single web site to a new location on the same or a different farm. They also provide a limited number of options to determine what content to copy, such as:
• which versions of documents to include; and

• whether to copy a site's security as well as its content.

While the STSADM export and import functions may fit the bill if you don't mind copying the entire site in which the source document library resides, it's not designed to copy just the individual document library alone.

EXPORT AND IMPORT WITH THE SHAREPOINT OBJECT MODEL

To accomplish the goal of copying an arbitrarily large document library, and only that document library, from one site to another, we'll need to use a bit of .NET code and the SharePoint object model. The code will perform two broad tasks:

export the source document library to a set of one or more files on disk; and


import the file-set created in step 1 to the target location.

You could write this code in a number of ways, but for simplicity, I'll create two .NET console applications: ExportDocLib and ImportDocLib. Both these applications must be run on the SharePoint web front-end server of the farm containing the source and target document libraries respectively.

ExportDocLib exports the source document library to operating system files. To create the application, open Visual Studio 2005 or later, and create a new C# console application. Next, add a reference to the Windows SharePoint Services .NET assembly, and then add "using" statements at the top of the program to reference the Microsoft.SharePoint and Microsoft.SharePoint.Deployment namespaces.

The rest of the code is fairly straightforward; you will need to provide references to the site collection and the web site within it that contains your document library (I simply referenced the RootWeb property of my site collection because my document library was contained in the top-level web site), a reference to the list to be copied, and information about where to create the export files and export log. I've also instructed SharePoint to retain the security via the IncludeSecurity switch, and to display progress to a command window as the program runs using the CommandLineVerbose switch. There are many other settings you can use, but those shown below are all you'll need for a basic list export:
using System;
using System.Collections.Generic;
using System.Linq;
using System.Text;
using Microsoft.SharePoint;
using Microsoft.SharePoint.Deployment;

namespace ExportDocLib
{
class Program
{
static void Main(string[] args)
{
// Get handle to web and doclib to export
SPSite site = new SPSite("http://localhost/sites/SITE1");
SPWeb web = site.RootWeb;
SPList list = web.Lists["Shared Documents"];

// Define export settings
SPExportSettings settings = new SPExportSettings();
settings.SiteUrl = "http://localhost/sites/SITE1";
settings.FileLocation = @"C:\Export Files\";
settings.BaseFileName = "SITE1.cmp";
settings.ExportMethod = SPExportMethodType.ExportAll;
settings.LogFilePath =
settings.FileLocation + "SITE1_export_log.txt";
settings.CommandLineVerbose = true;
settings.IncludeSecurity = SPIncludeSecurity.All;

// Add reference to document library to export
SPExportObject exportObject =
new SPExportObject(
list.ID,
SPDeploymentObjectType.List,
web.ID, false);
settings.ExportObjects.Add(exportObject);

// Export it
SPExport export = new SPExport(settings);
export.Run();
}
}
}

ImportDocLib is almost a mirror image of ExportDocLib. ImportDocLib will import the document library from the operating system files created by the ExportDocLib program. As before, start by creating a new C# console application in Visual Studio, adding a reference to the Windows SharePoint Services .NET assembly, and by adding "using" statements to reference the two Microsoft.SharePoint namespaces.

Next you'll create a SPImportSettings object and set its properties to define the location of the import files, the location of the site collection and web site where you want your new copy of the document library, and a location for the import log.

Although it’s beyond the scope of this article, the RetainObjectIdentity setting is noteworthy because its value will determine whether you can apply subsequent incremental imports to this same document library. For example, you could copy the full library once, and then periodically import only changed or new items from the source into the target library. To enable these subsequent imports, however, the RetainObjectIdentity setting must be set to "true." However, you may not set it to "true" if you will be importing a document library into the same content database as the source library, because all objects in a SharePoint database must have unique object IDs. The most likely scenario for which you would use the RetainObjectIdentity switch is to create a copy of a document library on a different SharePoint farm, and subsequently to refresh that second library with updates from the original.
using System;
using System.Collections.Generic;
using System.Linq;
using System.Text;
using Microsoft.SharePoint;
using Microsoft.SharePoint.Deployment;

namespace ImportDocLib
{
class Program
{
static void Main(string[] args)
{
// Settings for import
SPImportSettings settings = new SPImportSettings();

// File & path
settings.FileLocation = @"C:\Export Files\";
settings.BaseFileName = "SITE1.cmp";

// Site and web to import to
settings.SiteUrl = "http://localhost/sites/SITE2";
settings.WebUrl = "http://localhost/sites/SITE2";

// Set log file location
settings.LogFilePath =
settings.FileLocation + "SITE2_import_log.txt";

// Display messages while running
settings.CommandLineVerbose = true;

// Don't retain object GUIDs, only necessary
// if want to do incremental imports to same list
// at a later time
settings.RetainObjectIdentity = false;

// Keep security, versions, and date/time stamps
settings.UpdateVersions = SPUpdateVersions.Append;
settings.UserInfoDateTime =
SPImportUserInfoDateTimeOption.ImportAll;

// Import it
SPImport import = new SPImport(settings);
import.Run();
}
}
}

You might correctly observe that both the ExportDocLib and ImportDocLib routines can be combined into a single program. This would simplify the process in that you wouldn't need to execute two separate programs to complete the copy process. But when copying a document library from one SharePoint farm to another, you will need to run ExportDocLib on a WFE server in the source farm, and the ImportDocLib on a WFE in the target farm. Keeping them separate gives you the flexibility you need in such instances.

CONCLUSION 

With just a bit of .NET coding you can copy document libraries of arbitrary size from one site to another, within or between farms, without the need to purchase a third-party product. With a bit of additional coding you can add the capability of applying incremental updates from a master document library to a copy, thus keeping the secondary library in synch.

SharePoint Upload Size Limit on Server 2008 - IIS 7


A funny thing happens when you go to central admin and change the web app settings to a higher setting while running MOSS on Server 2008.

It would appear you get an error whenever any file over 28MB's is uploaded even if you changed this setting in the web app settings all the way up to 2GB's.  The security built into 2008 is at fault here.  When you make the changes in the web app settings they do not get transfered to the web.config automatically.  So you must manully update the web.config for all web apps needing this change and update the web.config in the 12 hive as well.
In the 12 hive we need this change.  This is the web.config file in the templates gallery.
Change the web config for all web apps that need the change
 This will stop the time out problem.
Now for the file size:
On a Windows Server 2008 computer that has IIS 7.0-only installations, you add the maxAllowedContentLength value. When you are running Windows SharePoint Services on a Windows Server 2008-based computer that has IIS 7.0, you find that you cannot upload files that are larger than 28 MB even though you have configured the large file upload settings. Usually, the error that users see is "The page cannot be displayed." In some circumstances, users may also see an "HTTP 404" error.

To work around this problem, set in the Web.config file for the Web application to have following settings under the <configuration> section:

  • Use Notepad to open the Web application Web.config file. By default, this file is in the following folder:
    Inetpub\wwwroot\wss\VirtualDirectories\VirtualDirectoryFolder
  • Add the following settings under the <configuration> section of the Web.config file:
    <system.webServer><security><requestFiltering><requestLimits maxAllowedContentLength="52428800"/></requestFiltering></security></system.webServer>
Note maxAllowedContentLength="52428800" in bytes has to match the size of file that you are trying to upload. Also, when you set the number, increase it slightly beyond the maximum file upload size that you have configured in SharePoint. If the number is equal to or less, users will not receive the error message that they are exceeding the size limit if they try to upload a file size larger than that specified by the administrator.
 Place the above code at the botom just before the close out config section like this:
 

Monday, November 22, 2010

SharePoint 2010 Business Data List Connector


The fast, easy and complete integration of external LOB data is a common requirement in the use of Microsoft SharePoint technology. Existing solutions, such as the Business Data Catalog (BDC) in SharePoint 2007 or the Business Connectivity Services (BCS)  in SharePoint 2010, are often too complex at the facility, require additional tools, bring with them limitations or they are available for certain SharePoint editions only.How to connect SharePoint lists to external data?
The Business Data List Connector for SharePoint 2007 and 2010 offers a SharePoint "External List" by connecting a native SharePoint list (no Web Part) to almost any external business data in just minutes, using a very simple browser-based list settings dialogue. No additional tools are required. It can be configured easily with 3 simple settings only. Every SharePoint admin can do this. The desired data can be populated to the list and presented without any restrictions, with the full functionality of common SharePoint lists made available: views, sorting and grouping, filters, calculated fields, search, lookups can be created as usual. You can add additional internal content columns or attachments to the external data, e.g. documents, comments, ratings, tagging or other Web 2.0 content. All list types are supported, e.g. contacts, tasks, events with optional write-back (CRUD). List workflows and notifications per RSS or email can be used to take business actions in SharePoint, if external business data records are changed. The BDLC additionally makes available any external data source to tag and use with the SharePoint 2010 Knowledge Management and Social Networking features without any restrictions.
You don't have any limitations, that still exists with out-of-the-box BCS external lists in SharePoint 2010. While BDC-based solutions are often difficult to migrate from WSS3.0 / SharePoint 2007 to 2010, BDLC works in the same way with both SharePoint versions. It's very simple to migrate, all connections and settings are kept working. There is a free upgrade available for BDLC from MOSS/WSS to SharePoint 2010 for all customers with Software Assurance (SA).
Slideshare: Business Data List Connector
Fig: To see the SharePoint BDLC presentation full-screen please click this image.
Existing ODBC, OLEDB, and .NET based drivers supported. You can connect to SQL Server, MySQL, Exchange, Active DirectorySharePoint, MS Office Excel, Access or text files, XML, EDI, Oracle, IBM DB2, InformixAS400, Cache, ERP/CRM systems e.g. MS Dynamics CRM / NAV / AX, SAP, Salesforce.com, QuickBooks, Peachtree, HL7, Virtual Store, general Web Services, .NET or COM+ objects and many others.

The SharePoint Business Data List Connector is available for Microsoft Office SharePoint Server 2007 (MOSS, all editions) and also for the free Windows SharePoint Services 3.0 (WSS).  Software versions for Microsoft SharePoint Server 2010 and Windows SharePoint Servicves 4.0 / Microsoft SharePoint Foundation are also currently available.

Whether you are an Systems Integrator or Service Provider, with the BDLC you can dramatically reduce costs, improve business process productivity, and rapidly create the "agile" enterprise for you and your clients.
  • Beat the competition with lower integration cost
  • Complete your integration project in less time
  • Bill a little bit more - but program much less
  • Get 30% discount as a reseller or implementer
Business Data List Connector for SharePoint 2007 and 2010 (BDLC)
Features & Benefits
The SharePoint Business Data List Connector (BDLC) provides the complete read-only or optionally write-back (CRUD) features of any native SharePoint list for almost any external LOB data sources in 3 simple steps only.
Simply connect any SharePoint list to any external data source
  • Simply click "Connect to external data source" in the list settings dialog.
  • In the BDLC settings dialog choose from the installed connection providers and enter the appropriate connection string (e.g. OLEDB, ODBC or custom) and validate it.
  • To select the desired data, please enter a select statement that is supported by your external data source and validate it. Check the result in preview mode and select primary key(s), to make use of advanced features.
  • Create the SharePoint list structure by adding additional columns, check the field / column mapping and update the data using the command buttons with one click. If a primary key is available, only modified data is updated in the list with high performance (background batch update possible).
  • You can optionally activate write-back to data source (CRUD: Create, Update, Delete features), if supported by the used driver.
  • You can additionally use Enterprise Enabler for SharePoint Business Data List Connector to connect SharePoint lists to complex bi-directional aggregations, transformations and manipulatiosn of entities among multiple Line Of Business applications, e.g. Web Services, .NET and COM objects, SAP etc.
So you can enable list workflow or change notifications per RSS or email to take business actions, if your external LOB data records are changed.
SharePoint connect external data to lists in just minutes
Fig.: Sample usage scenario of the SharePoint Business Data List Connector

SharePoint 2010 Site Templates


All templates are only available via the Powershell (with local Admin permission):

PS C:\Windows\system32> Add-PSSnapin Microsoft.SharePoint.PowerShell -ErrorAction "SilentlyContinue"
PS C:\Windows\system32> Get-SPWebTemplate

Name                 Title                                    LocaleId   Custom
----                 -----                                    --------   ------
GLOBAL#0             Global template                          1033       False
STS#0                Team Site                                1033       False
STS#1                Blank Site                               1033       False
STS#2                Document Workspace                       1033       False
MPS#0                Basic Meeting Workspace                  1033       False
MPS#1                Blank Meeting Workspace                  1033       False
MPS#2                Decision Meeting Workspace               1033       False
MPS#3                Social Meeting Workspace                 1033       False
MPS#4                Multipage Meeting Workspace              1033       False
CENTRALADMIN#0       Central Admin Site                       1033       False
WIKI#0               Wiki Site                                1033       False
BLOG#0               Blog                                     1033       False
SGS#0                Group Work Site                          1033       False
TENANTADMIN#0        Tenant Admin Site                        1033       False
ACCSRV#0             Access Services Site                     1033       False
ACCSRV#1             Assets Web Database                      1033       False
ACCSRV#3             Charitable Contributions Web Database    1033       False
ACCSRV#4             Contacts Web Database                    1033       False
ACCSRV#6             Issues Web Database                      1033       False
ACCSRV#5             Projects Web Database                    1033       False
BDR#0                Document Center                          1033       False
OFFILE#0             (obsolete) Records Center                1033       False
OFFILE#1             Records Center                           1033       False
OSRV#0               Shared Services Administration Site      1033       False
PPSMASite#0          PerformancePoint                         1033       False
BICenterSite#0       Business Intelligence Center             1033       False
SPS#0                SharePoint Portal Server Site            1033       False
SPSPERS#0            SharePoint Portal Server Personal Space  1033       False
SPSMSITE#0           Personalization Site                     1033       False
SPSTOC#0             Contents area Template                   1033       False
SPSTOPIC#0           Topic area template                      1033       False
SPSNEWS#0            News Site                                1033       False
CMSPUBLISHING#0      Publishing Site                          1033       False
BLANKINTERNET#0      Publishing Site                          1033       False
BLANKINTERNET#1      Press Releases Site                      1033       False
BLANKINTERNET#2      Publishing Site with Workflow            1033       False
SPSNHOME#0           News Site                                1033       False
SPSSITES#0           Site Directory                           1033       False
SPSCOMMU#0           Community area template                  1033       False
SPSREPORTCENTER#0    Report Center                            1033       False
SPSPORTAL#0          Collaboration Portal                     1033       False
SRCHCEN#0            Enterprise Search Center                 1033       False
PROFILES#0           Profiles                                 1033       False
BLANKINTERNETCONT... Publishing Portal                        1033       False
SPSMSITEHOST#0       My Site Host                             1033       False
ENTERWIKI#0          Enterprise Wiki                          1033       False
SRCHCENTERLITE#0     Basic Search Center                      1033       False
SRCHCENTERLITE#1     Basic Search Center                      1033       False
SRCHCENTERFAST#0     FAST Search Center                       1033       False
visprus#0            Visio Process Repository                 1033       False

So you can use the following command to create a collaboration portal:

PS C:\Windows\system32> New-SPSite -Url "http://<Your Path>" -Name "My Collaboration Portal" -OwnerAlias "<DOMAIN\USER>" -Template "SPSPORTAL#0"

Stuck on Starting”: Common Issues with SharePoint Server 2010 User Profile Synchronization

Thanks to HARBAR being the source on the UPS goodness

http://www.harbar.net/articles/sp2010ups2.aspx


Removing the Name ActiveX Control Warning in SharePoint 2010


When I initially looked at SharePoint 2010 I was disheartened to see that my old nemesis the Name.dll ActiveX control warning was still popping up on my sites. If you haven’t seen it yet, here is a screenshot:
image
The warning has to do with SharePoint wanting to show presence info (the little green icon next to people in your organization that are currently online). It often ends up showing on public SharePoint sites because it is elusive in development environment, it will only show in these circumstances:
  • IE7 or IE8
  • Site must not be in the Intranet zone, which typically automatically includes any site that you are local to or share a domain with
  • Must have Office, or Messenger or any other similar program installed
  • Must have NOT already said yes to IE installing the ActiveX control
If any one of those criteria isn’t met, the warning doesn’t show for you, but it most likely WILL show for anonymous internet users. In the past we had to use some JavaScript in the master page to hide this warning, but thanks to Kirk Evans’ blog post (http://blogs.msdn.com/kaevans/archive/2010/01/28/presence-in-sharepoint-2010.aspx), I have just learned that the message can also be turned off via Central Administration in SharePoint 2010, here’s how:
Open Central Administration and click Manage Web Applications. From there select your web application from the list and then from the ribbon click General Settings > General Settings:
image
After that, simply change the “Enable Person Name smart tag and Online Status for members” to No, and click OK:
image


That’s all you have to do to get rid of the warning, so no one has any excuse now if you are working on a public SharePoint site it should be turned off. Also, its worth noting that you can still get rid of the message via JavaScript in the master page if you prefer:
<script type="text/javascript">
    function ProcessImn(){}
    function ProcessImnMarkers(){}   
</script>
If you have access to Central Administration that is probably the preferred method, but if you don’t or you want to ensure that it never is turned on by mistake, the master page method is a sure fire way to hide it always.

Customizing Ribbon Positioning in SharePoint 2010 Master Pages


As you’ll likely notice in SharePoint 2010, the Ribbon is specially positioned to always be visible on the screen, even if you scroll down the page contents. This is accomplished by placing the Ribbon into its own container and then using client-side script to make the rest of the page contents take up the remainder of the browser’s height. You can see this in action by switching between the “Browse” tab and the “Page” tab on the SharePoint default homepage: The top of the scrollbar on the right side of the browser window will move up and down depending on whether the Ribbon is opened or not.

One of the questions I hear most often is how to enable or disable this behavior on a custom master page. To answer this question, I need to explain more about how the system works. There are three parts of the system: The markup on the master page, the CSS styles in the stylesheet, and the ECMAScript code linked to on the page.

Master Page Markup

Let’s start with the markup. SharePoint 2010 compatible master pages require many components, but there are a few key components that are used by the Ribbon positioning system. Going from top to bottom, the first component of note is the “_fV4UI” ECMAScript variable. In v4.master, it looks like this: <script type=”text/javascript”>
var _fV4UI = true;
</script>

This block tells the rest of the ECMAScript code in SharePoint that this master page is operating in SharePoint version 4 mode (version 4 corresponds to SharePoint 2010). This variable is used in the script that handles Ribbon positioning which I’ll discuss later on.
Moving down the master page source code, the next interesting component is the “body” tag. In v4.master, it looks like this:
<body scroll=”no” onload=”...” class=”v4master”>
The two important parts of the tag are the “scroll” and “class” attributes. The “scroll” attribute is used to force IE to hide the page scrollbar. Since SharePoint handles the scrollbar independently, we need to stop the browser from interfering. For other browsers, the scrollbar is hidden using CSS styles which are explained later in this post. The CSS class applied to the “body” tag is used to apply CSS styles in the corev4.css stylesheet which are part of the Ribbon positioning system. If you are using a custom stylesheet, you may leave this out; but make sure to apply the needed CSS styles in some other way (perhaps by referencing “body” directly in your stylesheet).
The next important component on the master page is the Ribbon container. In v4.master, it looks like this:
<div id=”s4-ribbonrow” class=”s4-pr s4-ribbonrowhidetitle”>
     ...
</div>
Let’s look at this piece by piece. First, you’ll notice that the element is a div so that it takes up the width of the browser and acts as a block-level HTML element. After that, is the ID which is a mandatory part of the system: the ECMAScript logic for Ribbon positioning uses this ID to find the Ribbon container. If you omit or change this ID, the Ribbon positioning system will abort and your Ribbon will not stay docked to the top of the page. I’ll discuss the steps to enable and disable the system later on in this post. The next part of the Ribbon container element is the “class” attribute which lists the CSS classes applied to it. The first one is just a layout class used to make the container full width and block displayed. “pr” stands for Page Row. The second CSS class is used in the Ribbon positioning system to tell what state the Ribbon is in currently. It is set to “s4-ribbonrowhidetitle” by default, but that is changed to the correct value once the ECMAScript code on the page initializes.
The Ribbon control itself lives inside the Ribbon container. Also present are the controls that appear in the top row of the ribbon (e.g. Site Actions, breadcrumb navigation button, edit/save button, the Personal Actions menu, etc.), the notifications area, Publishing Console, and Web Part adder. Nothing else should be placed into this container as its height is set using static values that will not adjust to additional content. To add more chrome above the Ribbon, you should add a new element above the Ribbon container.
Immediately following the Ribbon container are two other important elements on the master page: the Workspace element and the Body Container. These elements look like this in v4.master:
<div id=”s4-workspace”>
                <div id=”s4-bodyContainer”>
                                ...
                </div>
</div>
The Workspace container is the element that remains scrollable when the Ribbon positioning system is enabled. Like the Ribbon container, its ID is mandatory as it must be referenced from ECMAScript code during page load. Directly inside of the Workspace container is the Body Container. Its ID is also required. Body Container is used to determine the width of the page content within the client-side script. Both of these elements must be present on the master page for the Ribbon positioning system to run. If one or both are missing, the system will abort.
There is one more interesting element on the master page: The Title container. As you’ll notice in v4.master, opening a Ribbon tab other than Browse will hide the page title and top navigation and replace it with the appropriate Ribbon tab. The important distinction to note here is that the “Browse tab” is not actually a tab. In reality, it is simply an empty Ribbon tab with normal HTML below it. In v4.master, the Title container looks like this:
<div id=”s4-titlerow” class=”s4-pr s4-notdlg s4-titlerowhidetitle”>
     ...
</div>
Like the other containers discussed above, the Title container must have a specific ID, in this case “s4-titlerow.” However, unlike the other containers, if the Title row ID is not present, the Ribbon positioning system will still run. If you leave out the ID or remove the element completely, the system will just ignore it and handle everything else appropriately. This means that if you leave the element but remove the ID, the Title area will not be removed from the page when you open a Ribbon tab. The CSS classes are also worth noting: As I explained above, “s4-pr” just makes the element take up the full browser width and display as a block element; “s4-notdlg” is used to stop the element from appearing if the page is being loaded in a Modal Dialog; “s4-titlerowhidetitle” is used by the Ribbon positioning ECMAScript to handle the current state of the Ribbon - just like the corresponding class on the Ribbon container, it is updated accordingly when the client-side script initializes at page load.

CSS Styles

All of the CSS styles pertinent to the Ribbon positioning system are in corev4.css. They are all required for the Ribbon positioning system to function properly. The first style rule of importance is “body.v4master” which is defined as follows:
body.v4master {
                height: 100%;
                width: 100%;
                overflow: hidden;
}

This makes the body of the page take up the full width and height of the browser and hides the scrollbar for most browsers (remember that the “scroll” attribute on “body” handles this for some versions of IE).
Next is the CSS rule for the Ribbon container:
body #s4-ribbonrow {
     min-height: 43px;
     background-color: #21374c;
     overflow-y: hidden;
}
This makes the Ribbon row take up 43px of vertical space at minimum and allows groups that cannot be fit into the browser (after scaling) to “fall off the edge” of the ribbon.
Below the Ribbon container styles are a set of styles that only apply to printing. I won’t go through each of these, but suffice to say that these styles are meant to undo some of the positioning applied by the system so that the full page displays when printed.
Further down the stylesheet are the styles for the Workspace and Body Container elements:
body s4-workspace {
                overflow-y: scroll;
                overflow-x: auto;

                position: relative;
                left: 0px;
}
body #s4-bodyContainer {
                min-width: 760px;
}
First, we make the Workspace element always show a vertical scrollbar (to prevent shifting of page contents on load) and show a horizontal scrollbar only if necessary. The other two declarations in this rule are used for other layout purposes. The Body Container gets assigned a minimum width to ensure that shrinking the browser window down won’t render SharePoint unusable.

ECMAScript

The real logic of the Ribbon positioning system is in the ECMAScript code. I won’t go through the actual code that runs, but if you are curious, you can open up init.debug.js in your layouts\1033 folder and look for “FixRibbonAndWorkspaceDimensions()”. The Ribbon positioning logic is triggered in three ways: when the page loads, when the browser is resized, and when the Ribbon is minimized or maximized (for example, by double-clicking a tab title). Note that switching between the “Browse” tab and other tabs is a form of minimizing and maximizing the Ribbon.
The logic generally works like this:
· First, we look for the four interesting elements on the page: the Ribbon container, the Workspace container, the Body Container, and the Title container. If any of the first three cannot be found, the code aborts.
· We then check if the Workspace element has the CSS class “s4-nosetwidth” applied to it. If so, it will not set the width of any elements. This is useful if you have a fixed-width master page design.
· Next, we use static values plus some runtime information to determine the height that should be set on the Ribbon container. If the Ribbon container has its “visibility” style set to “hidden,” the system will set the Ribbon container’s height to 0px. This is the supported way to hide the Ribbon container for certain users but keep the Ribbon positioning logic when the Ribbon is displayed.
· Now, the important calculation occurs: The system gets the browser’s viewport height (the area of the window that contains the SharePoint page) and subtracts the height of the Ribbon container and the top position of the Ribbon container to determine how much space is left below for the Workspace container.
· The calculated height is set to the Workspace element and then some extra logic is run to set width and scroll position information accordingly.
At the very end of the ECMAScript logic, a set of callback functions are run for components that need to know when the Ribbon positioning system has run. If you need to run some code at this point, you can call SP.UI.Workspace.add_resized(handler) which will add your handler to the list.

Enabling and Disabling the System

Now that you have a better idea of how everything works, let’s run through the necessary steps to enable and disable the system for your master page.
Enabling the Ribbon Positioning System
The easiest way to take advantage of the Ribbon positioning system is to derive your custom master page from v4.master. All you have to do is pay attention to the components listed above so that you don’t remove something that’s important. If you end up using a custom CSS file, make sure to include all of the CSS rules shown above. The ECMAScript is included automatically by the ScriptLink control. ScriptLink is required on all SharePoint 2010 compatible master pages, so you get that for free.
If you are retrofitting an old master page to work with the Ribbon positioning system, you can simply follow the steps at http://msdn.microsoft.com/en-us/library/ee539981%28office.14%29.aspx to upgrade your master page. Most of what is discussed on this post is covered briefly in that documentation.
Disabling the Ribbon Positioning System
If you’re customizing v4.master, but wish to let the Ribbon scroll up with the page contents, you’ll need to do a few things:
In your master page:
1) Remove the “_fV4UI” variable from the top of the page. It will still be emitted by the SPWebPartManager later on in the page’s markup, but it will not be present when the on-load events for the Ribbon position system are usually attached. This will stop the code from running when the page loads which will improve rendering performance.
2) Remove or change the Workspace element’s ID to make the ECMAScript code abort early during window resizes and Ribbon minimize/maximize events. You can leave the element, but just change or remove the ID.
3) Remove the “scroll” attribute from the Body tag.
In your CSS stylesheet:
1) Remove or change the width, height, and overflow declarations on the “body” tag.
2) You can optionally remove the s4-workspace and s4-bodyContainer rules since they are no longer necessary.

SharePoint 2010 Governance


Governance is a key component to ensuring the success of your SharePoint 2010 deployment, and one we frequently get asked about it as we travel to conferences and events. Represented by a set of established processes, procedures, and stakeholders, a well designed and implemented governance plan promotes adoption, ensures participation, and maximizes ROI.  By using the governance techniques, best practices, and recommendations available below, you can align your policies for using SharePoint 2010 with your culture and goals while still enabling teams and individuals to effectively collaborate and share information.

Resources


Resource Center (Governance in SharePoint Server 2010)
The Governance Resource Center provides documentation, references, and solutions to help IT Professionals plan and prepare to govern SharePoint 2010 environments.  The Governance Resource Center aligns to three (3) specific areas:
1.       IT Governance
2.       Information Management
3.       Application Management

Resource Center (ALM Resource Center | SharePoint 2010)
The ALM Resource Center provides documentation, resources, references, and solutions to help Developers with the coordination of all aspects of software engineering.


Whitepaper (SharePoint 2010 Governance Planning)
The SharePoint 2010 Governance Planning whitepaper targets the business value of governance and provides guidance for the necessary governance planning and implementation of SharePoint Server 2010.


Whitepaper (Implementing Governance in SharePoint 2010)
This document focuses on the product and technology aspects of SharePoint governance – the technical implementation. It provides high-level guidance on the many configuration options SharePoint provides to enable you to manage the environment for the benefit of all.


Whitepaper (SharePoint Server 2010 Operations Framework and Checklists)
This document details the operational processes, tasks, and tools that are required to operate and maintain a Microsoft SharePoint Server 2010 environment. It explains how the management of SharePoint Server 2010 fits in with the overall Microsoft Operations Framework (MOF) model.


Publication (Essential SharePoint 2010: Overview, Governance, and Planning (Addison-Wesley Microsoft Technology Series)
Essential SharePoint 2010 provides information derived from a business value perspective that documents and illustrates how to plan and implement SharePoint 2010-based solutions to maximize business results.


Virtual Lab (Configuring Tenant Administration on SharePoint Server 2010)
After completing this lab, you will be better able to create a new Tenant Administration site collection, manage site collections through Tenant Administration, and create a partitioned service application.


Virtual Lab (Monitoring SharePoint 2010)
The objective of this lab is to provide a basic introduction to using Service Level Monitoring to monitor services provided by SharePoint Server 2010. By the end of this lab you will be better able to create a Service Level Object, generate a Report of SharePoint Services Availability, and configure a Service Level Dashboard.


Solutions
Active Directory Domain Services Markers
Active Directory Domain Services Markers can be used to prevent and report on SharePoint installations in your organization.
Quotas
Quotas are used to specify limits to the amount of storage that can be used by a site collection and establish resource limits on sandboxed solutions.
Locks
Locks are used to prevent users from from adding content to or accessing site collections.
Self-Service Site Creation
Self-Service Site Creation is used to allow or prevent  users from creating site collections on demand.
For a comprehensive list of governance features see also http://technet.microsoft.com/en-us/library/cc262287.aspx.